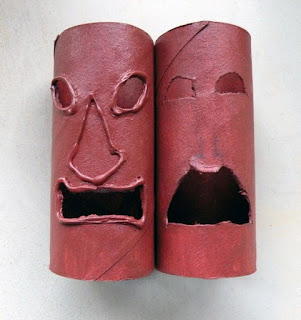
DIY Tea Light Tiki
This easy and affordable DIY Tiki is sure to brighten any summer party! These make great accents around the buffet table or a simple table centerpiece. I created these for a luau party on a budget.
Supplies:
Paper roll(s)
X-acto knife
Glue gun
Tape
Scissors
Pen
Paint brush
FolkArt acrylic paint: brown, green, orange
Puffy paint: pink, blue ( these paints make it easier to do the eyebrows)
Green construction paper
LED tea light candles
Directions:
1. First trace a tiki face onto the paper roll then use an X-acto knife to cut it out. Be careful. Don't cut out a nose.
2. Next I decided to do 2 different looks. On the left I used a glue gun to trace the eyes, nose and mouth. On the right I did not. You can choose which style you like best. Then paint the inside and outside brown.
( NOTE: If you are using a colored LED tea light it would be best not to paint the inside so that the LED color is more vibrant.)
3. Once the brown paint it dry time to add color to the face. Have fun and be creative making your own designs!
4. Cut a piece of green construction paper 5.5 x 2. Then cut about .5 inches to look like grass. Roll in a circle and make sure it fits in the top of you tiki then tape it. Next cut a circle out to glue on the bottom of the grass. Now place it inside on the top of the tiki. It should fit tightly so that no glue or tape is needed to hold it in place. Rotate pushing the grass in and out every few pieces.
5. Place tape on opposite sides of the tea light and put it in the bottom of the tiki. You can also glue the tea light in. I prefer tape so that I can reuse the tea light and tiki. Now enjoy your party.


Comments
Post a Comment