DIY Halloween Haunted Tree
Halloween is one of my favorite holidays. I will be creating some new and fun Halloween decorations this year. Going to Disneyland last year for Halloween time really inspired me! This year I want a Disney themed Halloween. Lets begin with a DIY Halloween Haunted Tree. This idea came from the scary trees in the Disney Snow White movie.
Supplies:
Paper roll any size
Newspaper
Glue gun
Apple Barrel acrylic paint in pavement
Paint brush
Masking tape
X-acto knife
Pen
Tea light in any color
Directions:
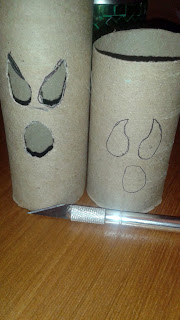
Step 1: Draw a face onto the paper roll and carve it out with an X-acto knife.
Step 2: Cut or rip a piece of newspaper into a small right triangle and twist it.
Step 3: Tape the larger end of the newspaper onto the paper roll with masking tape. Place as many tree limbs as you want. I think 3-4 tree limbs look good.
Step 4: Now repeat on the top. Again 3-4 tree branches look good.
Step 5: Use a glue gun and press it lightly against the paper roll. Go around the roll in a vertical motion.
Step 6: Paint the inside and outside. I tried two different colors. For the smaller one I used Apple Barrel acrylic paint in black gloss. I wasn't happy with that color so I used Apple Barrel acrylic paint in pavement for the taller one. I really love how the color on the taller one came out. Once the paint completely dries place a tea light in the bottom. It fits perfectly!


Comments
Post a Comment